记录一下CentOS |
您所在的位置:网站首页 › centos 安装nvidia驱动 › 记录一下CentOS |
记录一下CentOS
|
文章目录
前言一、查看显卡型号1、直接可以查到具体的显卡型号2、不直接显示显卡型号
二、查看对应的驱动1.nvidia官网直接查询2.指令查询1、进入到文件目录2、打开文件并修改3、删除缓存并新建元数据缓存
三、安装依赖1、禁用默认显卡2、拉黑默认驱动3、备份并重新建立 initramfs image file :4、重启系统5、验证是否禁用nouveau6、添加ELRepo源
四、安装驱动1、给下载的驱动添加权限:2、安装3、安装过程中提示问题的选择1、Would you like to register the kernel module souces with DKMS? This will allow DKMS to automatically build a new module, if you install a different kernel later? 选择 No2、Install nvidia’s 32-bit compatibility libraries?选择 No3、Would you like to run the nvidia-xconfigutility to automatically update your x configuration so that the NVIDIA x driver will be used when you restart x? Any pre-existing x confile will be backed up. 选择 Yes
4、查看驱动是否安装成功
前言
简单记录在CentOS8系统中远程安装显卡驱动时所遇到的一些问题以及解决方案 一、查看显卡型号 lspci | grep -i nvidia这里在查看显卡型号的时候有两种可能出现的结果: 1、直接可以查到具体的显卡型号如: 显示一个代码,如: https://www.nvidia.cn/geforce/drivers/
可能会出现报错(其实不耽误查看驱动版本): 做如下修改: [BaseOS] name=CentOS-$releasever - Base # baseurl=http://mirrors.cloud.aliyuncs.com/$contentdir/$releasever/BaseOS/$basearch/os/ baseurl=http://mirrors.aliyun.com/centos/8-stream/BaseOS/$basearch/os/ gpgcheck=1 enabled=1 gpgkey=file:///etc/pki/rpm-gpg/RPM-GPG-KEY-centosofficial sudo vim CentOS-AppStream.repo进行修改: [AppStream] name=CentOS-$releasever - AppStream # baseurl=http://mirrors.cloud.aliyuncs.com/$contentdir/$releasever/AppStream/$basearch/os/ baseurl=http://mirrors.aliyun.com/centos/8-stream/AppStream/$basearch/os/ gpgcheck=1 enabled=1 gpgkey=file:///etc/pki/rpm-gpg/RPM-GPG-KEY-centosofficial 3、删除缓存并新建元数据缓存 dnf clean all # 清除所有的缓存文件 dnf makecache # 制作元数据缓存此处参考: https://www.cnblogs.com/linnuo/p/16284877.html 三、安装依赖 yum -y install kernel-devel yum -y install epel-release yum -y install dkms yum -y install gcc如果指令查询时不解决源的问题,此处可能会报相同的错误,换源即可 !!!这里要记住kernel版本号,安装驱动时需要使用 1、禁用默认显卡 vim /etc/default/grub修改: GRUB_TIMEOUT=5 GRUB_DISTRIBUTOR="$(sed 's, release .*$,,g' /etc/system-release)" GRUB_DEFAULT=saved GRUB_DISABLE_SUBMENU=true GRUB_TERMINAL_OUTPUT="console" GRUB_CMDLINE_LINUX="crashkernel=auto rd.lvm.lv=centos/root rd.lvm.lv=centos/swap rhgb quiet rd.driver.blacklist=nouveau nouveau.modeset=0 nouveau.modeset=0 rd.driver.blacklist=nouveau plymouth.ignore-udev" GRUB_DISABLE_RECOVERY="true" 2、拉黑默认驱动 vim /etc/modprobe.d/blacklist.conf添加内容: blacklist nouveau 3、备份并重新建立 initramfs image file : * 备份 the initramfs file $ sudo mv /boot/initramfs-$(uname -r).img /boot/initramfs-$(uname -r).img.bak * 重新建立 the initramfs file $ sudo dracut -v /boot/initramfs-$(uname -r).img $(uname -r) 4、重启系统 reboot 5、验证是否禁用nouveau lsmod | grep nouveau #应该不返回任何信息若提示lsmod命令不存在,需要安装: yum install -y kmod 6、添加ELRepo源对于CentOS-8 yum install https://www.elrepo.org/elrepo-release-8.el8.elrepo.noarch.rpm另外: 对于CentOS-7 yum install http://www.elrepo.org/elrepo-release-7.0-2.el7.elrepo.noarch.rpm对于CentOS- 6 yum install http://www.elrepo.org/elrepo-release-6-6.el6.elrepo.noarch.rpm对于CentOS- 5 yum install http://www.elrepo.org/elrepo-release-5-5.el5.elrepo.noarch.rpm 四、安装驱动 1、给下载的驱动添加权限: chmod u+x NVIDIA-Linux-x86_64-515.57.run 2、安装需要先将下载的驱动上传到服务器,后进入文件所在路径下进行 ./NVIDIA-Linux-x86_64-515.57.run --kernel-source-path=/usr/src/kernels/4.18.0-80.el8.x86_64 #填写相应的驱动版本号和kernel文件路径
|
 其中GK110BGL就是显卡型号,这样可以直接在nvidia官网查看相应的驱动型号
 其中2204就是显卡型号,需要进入以下网址进行查询: http://pci-ids.ucw.cz/mods/PC/10de?action=help?help=pci 将2204输入,进行查询
  如下便是显卡型号
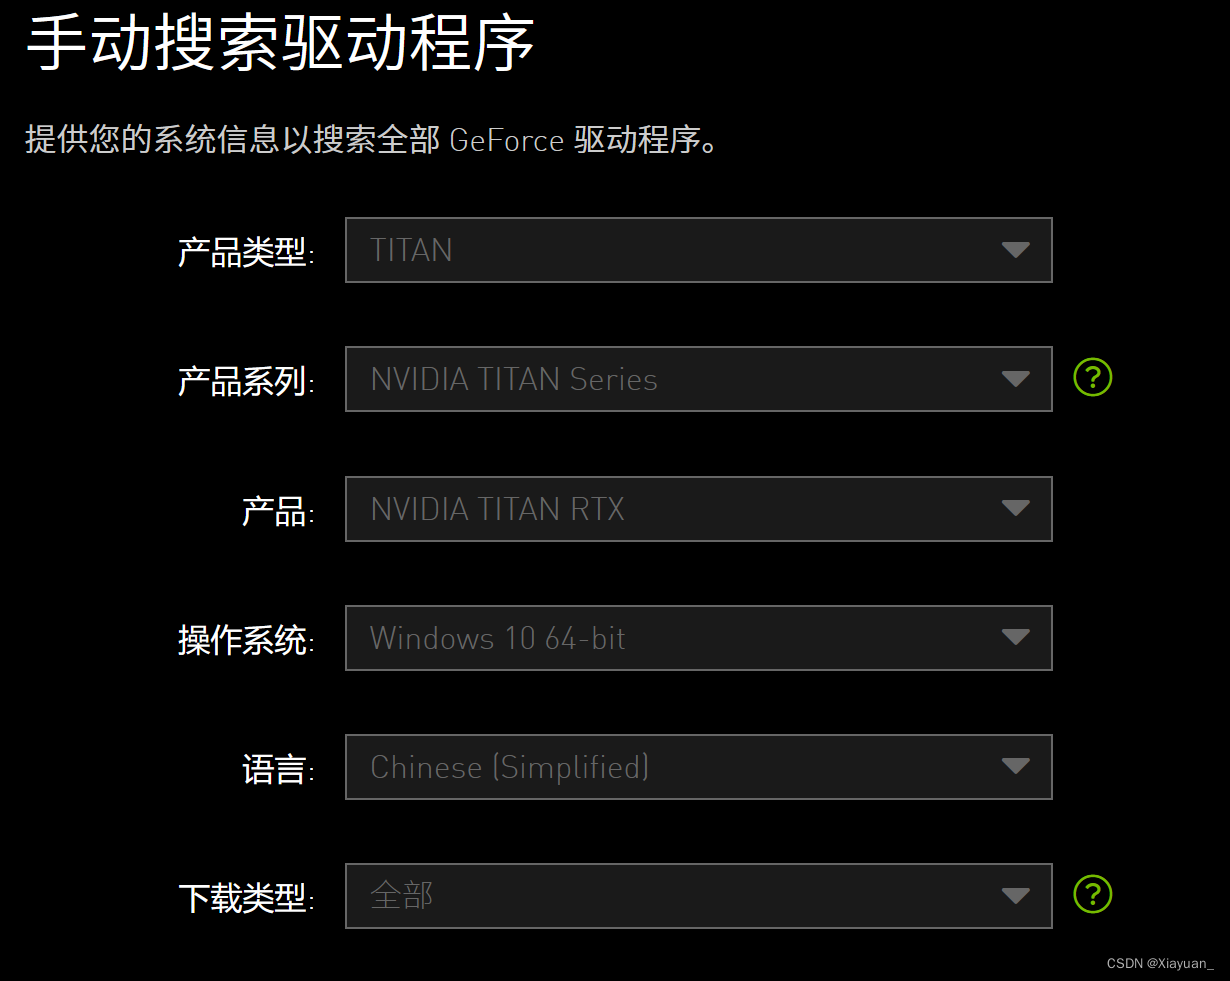
 515.57就是支持的驱动版本,可以去官网下载
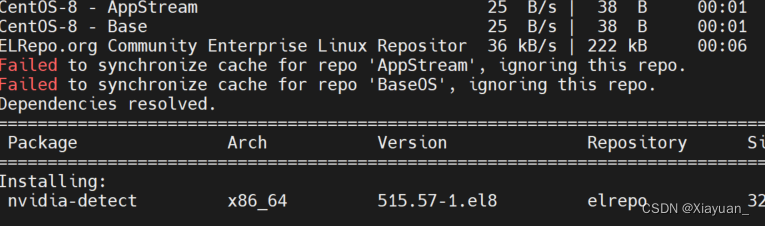 应该是源的问题,需要进行换源,此处换的是:
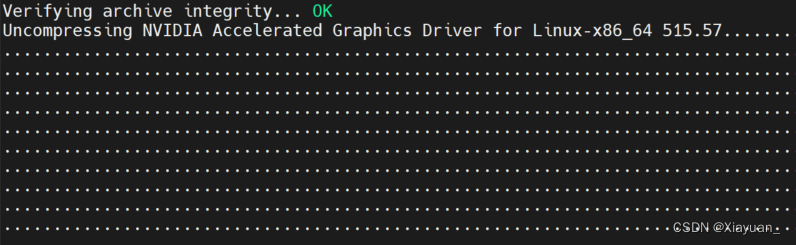
 附 cuda各版本下载地址:https://developer.nvidia.com/cuda-toolkit-archive
【本文地址】
今日新闻 |
推荐新闻 |